How to Do a Salicylic Acid Peel at Home
A salicylic acid peel is unbeatable as a treatment for acne, blackheads, large pores and pimples. Frequent light peels, if done properly, can clear up these issues for good. Learn how to do one at home on this page.

What makes a salicylic peel so good for acne? How to prepare and apply step-by-step? The best frequency for your home regime, expectations, maintenance? All about how to do a salicylic acid peel at home below.
(Do not use if allergic to Aspirin or pregnant)
Why is a Salicylic Acid Peel So Beneficial for Acne?
Derived from Willow bark, salicylic acid is the sole star of the Beta Hydroxy Acid group (BHA) and also a main constitute of Aspirin.
It is fat soluble so is attracted to and dissolves fats
Effectively, salicylic acid breaks down lipids and oils/sebum. It can get right into pores—which is why it’s so good for acne:
- Helps clear and prevent blackheads, pimples/whiteheads and cysts
- Also very beneficial in reducing acne scars
- Degreases skin and helps to balance oil production
- Dissolves the fatty glue between cells, exfoliating skin and opening pores
- The acid then neutralizes the bacteria inside—this reduces inflammation (straight away – very good for active, red pimples) and helps prevent further breakouts
- Helps with large pores by reducing/rebalancing oil production and improving skin texture
What Concentration of Salicylic Acid to Use
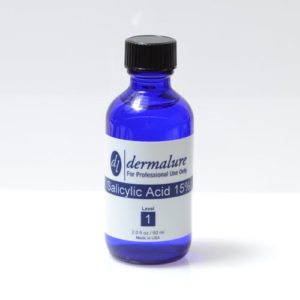
Start with a percentage of 15%
Anything higher is too strong in the beginning and can be very irritating.
>> There is no need to go straight into a stronger dose, as the effectiveness of peels depends on your skin.
In other words: the effect of using 15% in the beginning is the same as using 30% after a few months of usage.
Skin gets used to it and gets stronger, so can handle (some would say needs) higher concentrations.
To repeat—don’t be tempted to go straight into using a concentration any higher than 15%. Frequent light peels are far more effective and safer.
Where To Start: A Treatment Plan
Aim to perform a 15% salicylic acid peel every 2 weeks, for 2 or 3 months.
The first peel will be for 1 minute.
Notice how your skin reacts and increase in 1 minute intervals each time for a maximum of 5 minutes.
This time frame of 2-3months will show great results, and often after the very first treatment. This will allow cumulative benefits, and this is all many people need to see vast improvements in acne and other skin conditions.
Maintain results with a monthly application of 15-20%.
If you still have blockages, scars or concerns, repeat the treatment plan with a concentration of 20%. Build slowly.
What You Will Need
- Normal cleanser
- Rubbing alcohol (OTC 70%) or prep solution: this removes fats and oils from skin allowing the peel to work optimally
- A 15% SA peel
- Small glass bowl and a fan brush/gauze pad to apply
- 1/2cup baking soda in 2cups water (use your sink): this is your neutralizing solution which is very important. You can buy specific neutralizers>>> but baking soda works perfectly. Have a soft cloth or cotton pads ready
- Vaseline: apply to eyebrows, lip area and nostrils, you don’t want the acid touching those!
- A gentle, emollient rich moisturizer to apply after (coconut oil is good as it also contains anti bacterial properties)
- A timer/clock
How to Do a Salicylic Acid Peel at Home
- Cleanse skin normally and pat dry
- Apply the rubbing alcohol all over, this is important to degrease skin which allows the acid to work
- Put a small amount of salicylic into the glass bowl and using the fan brush apply evenly to skin
- Another option is to use a gauze pad, soak it in the solution and apply like a toner. If you choose this method wear gloves!
- Be careful to avoid getting it in your eyes! Squeeze the brush/pad out on the side of the dish to avoid drips
- Apply in even strokes all over face – best to start on the t-zone and work out to cheeks, as this area tends to be oiliest
- Avoid the eye, lip and neck areas
- Start timing as soon as you apply that first stroke
- Watch your skin in the mirror as you leave it on for 1 minute
What to expect:
- Salicylic acid crystalizes on skin so expect some “frosting”. This looks like a light dusting of skin, don’t be alarmed it’s normal
- Skin can become quite hot, a small fan can help with discomfort but if it’s too much or burning remove
- It might tingle or sting a bit—this is normal and a sign it’s working
- The tingling/stinging may subside after 30secs, however it’s still working after this so stick to the timeframe. Of course if it gets worse, remove
How to Remove the Salicylic Acid Peel

- Once your minute is up, apply the baking soda solution all over skin to neutralize the acid by splashing your face for at least one minute. The sting can increase for the first few seconds, keep going and it will subside
- Continue to splash your face for at least 1minute. Then wipe throughly all over with the soft cloth, repeating at least 3 times
- Your face may still feel quite hot, if so splash with plenty of cold water until it calms down. Or, apply a cold wash cloth to skin and leave it on
- Pat dry and apply a calming, hydrating moisturizer or oil
Expectations and Aftercare:
- This treatment can open whiteheads and milia
- These can then be very gently extracted by squeezing with a tissue. Very gently. It is, of course, preferable to leave them alone—the salicylic acid would have worked on the bacteria inside which will dry them out very quickly
- Slight redness, dryness and a little irritation is normal for a few days. Keep applying moisturizer
- Sunscreen is vital. Shade is preferable for the first days after
- Don’t use any other exfoliation scrubs or procedures
- Sometimes there can be slight flaking of the skin from salicylic acid—don’t pick this. Just keep applying moisturizer or Vaseline and it will heal in a few days
Results Of Your At-Home Salicylic Acid Peel
You can see great improvements after the first treatment. It will take a few weeks to see vast differences.
Some people no longer have a problem with blackheads—they completely disappear, and breakouts are greatly reduced.
Once you’ve achieved your wanted results, a peel every month or two is enough to maintain these benefits.
At Home Salicylic Acid Peel Product Recommendations
A15% concentration, with no other active ingredients that will get in the way of the best results.
A small bottle is enough as you don’t need to use a lot, and may want to increase the concentration to 20% after you’ve finished it – this is an easy way to build up.
This is a 30ml bottle, great size for starting and a good price.
This range* also has 20% and 30%, if you are looking at increasing.
The blue bottle is important – keep it out of sunlight!
(Be sure to follow the instructions on the specific product you choose)
Not sure about using a heavier peel? Get the same results with consistent use of a 2% application.
It’s a lot easier, safer and will help keep your skin clear.
Using salicylic acid peels as an acne solution can be remarkable
Often it is the one thing that can help clear up skin, once and for all.
The exfoliation action also stimulates cell renewal—which helps with healthier, stronger skin in the long term.
This is much more beneficial than using benzoyl peroxide, which works by drying up blemishes and oil, and can be effective but severely drying. BP can also completely unbalance skin, making the problem worse in the long run.
Used with knowledge and caution, home chemical peels are a great, easy way to take care of your skin.
